It’s December! Where does the time go? It’s a cold, quiet Sunday afternoon here in Cleveland. I’m watching Inception, eating butternut squash bisque, and writing crochet patterns. Isn’t that what everyone’s doing?
Thanks to everyone who took my survey – over 200 responses and more coming in every day! The overwhelming majority of you said you wanted more crochet patterns and I aim to please (and shouldn’t be too hard – this is a crochet blog).
I’ve written a pattern for this lovely hat. It’s chunky, it’s bulky, and I have been wearing it all afternoon. Since we’ve determined not to turn on our heat until absolutely necessary, the air in the apartment has an edge to it.
This hat is ribbed. It’s made flat. You sew up the side and sew up the top and you have yourself a sideways-stitched hat. Most crochet hats are made in the round, from the top down, but this method makes the stitches go in a different direction. If you can make a rectangle – you can make this hat!
Crochet Hat: Free Pattern (Ribbed)
Materials
- Size L (8.0mm) crochet hook
- 106 yards super bulky yarn – I used Lion Brand Wool-Ease Thick & Quick. This pattern uses every last inch of yarn, so if you’re planning to make a bigger hat, you’ll need a second skein of yarn.
Stitches Used
- HDC – Half-double crochet
- Ch – Chain
- SC – Single Crochet
Pattern
Note: Pattern is worked in back loops only (BLO).
Leaving 12 inch tail of yarn, Chain 24 + 2 (counts as first HDC)
Row 1: HDC in each stitch across (25 stitches)
Row 2: Chain 2, turn. Working in BLO, HDC in each stitch across (25 stitches).
Repeat Row 2 until you have 21 Rows. At this point, you’ll have a rectangle measuring 16.5 inches wide by 13 inches tall.
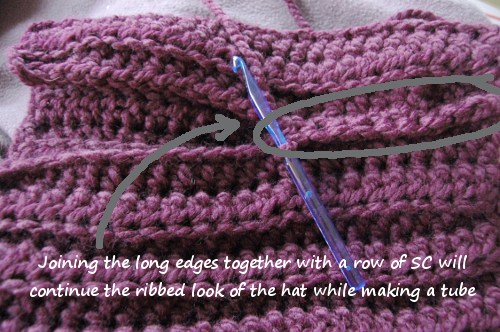
Do not fasten off yarn. Fold long sides together. Single crochet the sides together. This row will be ridged, just like the rest of the hat.
Do not fast off yarn. Single crochet around the edge of the tube you just made. This will be the edging of what you’ll fold up to be the brim of your hat.
Now, fasten off yarn.
Using the long tail of yarn you left at the beginning, loosely weave the needle the entire way around the second side of the tube in two inch long stitches. You’re trying to create a drawstring that will pull the top of the hat closed. Pull end of yarn so the top of your hat tightens.
Weave in ends.
This hat is easy to crochet – it’s the assembly part that can be a little tricky. Hope the picture helped. This is a quick crochet gift that’s perfect for those last minute parties.
Related Posts:


