Browse Category by Free Patterns

Free Crochet & Knit Patterns – Hats, Accessories, Baby Items, and More!

Crochet, Free Patterns, Projects

Easy & Quick Crochet Cowl Pattern

I wanted to write a pattern for the perfect cowl I could toss on for brisk fall mornings. Not something as intense as the chunky knit cowl pattern I use when it’s snowing, just something that would keep out the whippy morning wind.

Crochet Scarf Pattern

This easy and quick crochet cowl works up in a snap with bulky yarn and a size N crochet hook. It’s pretty easy and the result is a semi-open weave cowl to top off your I-refuse-to-admit-it’s-winter-so-all-I-will-wear-is-a-cardigan look. (It’s ok, we’ve all been there.) It’s functional without being over the top.

DSC_1627

Easy & Quick Crochet Cowl Pattern

Materials: 

  • Size N (10mm) Crochet Hook
  • 1.5 Skeins of Lionbrand Wool-Ease Chunky Thick & Quick (or 150 yards of any “Size 6” – super bulky weight yarn or roving)

Finished Size: 31 inches long; 8 inches wide

Special Stitches

3-DC Cluster: Also known as DC3tog. *YO, insert hook into stitch. YO, pull up a loop. YO, pull through 2 loops. Two loops on hook. * Repeat from * to * twice more until there are four loops on hook. YO, pull through all loops on hook.

Directions

Chain 49. Join with slip stitch to form ring. Cowl is worked in the round.

Round 1: Ch 1, sc in each stitch around. Join round with sl st into first ch-1. (49 sc)

Round 2: Ch 2, counts as first DC in 3-DC cluster. DC2tog in same stitch to complete first 3-DC cluster. *Chain 1, skip next stitch. Work 3-DC cluster in next stitch.* Repeat instructions from * to * around for the rest of the round. Join round with sl st into first cluster. (24 clusters)

Round 3: Ch 2, counts as first DC in 3-DC cluster. DC2tog in same stitch to complete first 3-DC cluster. *Chain 1, skip next ch-1 space. Work 3-DC cluster in next st (which is the 3-DC cluster of the previous round).* Repeat instructions from * to * around for the rest of the round. Join round with sl st into first cluster. (24 clusters)

Rounds 4 – 7: Repeat Round 3

Round 8: Ch 1, sc in east stitch around. (49 sc)

Fasten off

DSC_1654

DSC_1660

Easy Crochet Cowl Pattern
Crochet, Free Patterns, Projects, Uncategorized

Crochet Flower Pattern

Crochet Flower Pattern

Having a go-to crochet flower pattern should be every crocheter’s goal. This crochet flower isn’t fancy, but it works up quickly and is great for adding detail to a project.

Crochet Flower Pattern

It’s a great flower for beginner to learn – I’ve even written out the crochet abbreviations and taken pictures along the way so you know exactly what to do. For the more experienced crocheter, this is a good “base flower” that you can add more petals to (why stop at 5?) or a second layer for added volume.

Crochet Flowers

Crochet Flower Pattern

Materials:

  • Crochet Hook & Yarn – Any Size! Depends on your project, but this will work up with everything from thread to bulky yarn
  • Flowers below crocheted with a size H (5.0mm) crochet hook and worsted weight yarn (Vanna’s Choice)

Directions:

Chain 3, slip stitch into first chain to form a ring.

Round 1: Chain 2 (counts as a double crochet). Work 9 more double crochet into the center of the ring (10 DC total). Join to top of chain 2 with a slip stitch.

Round 2: Chain 3 + 1 (counts as chain-3 space plus 1 single crochet). Skip 1 stitch, single crochet in next stitch. *Chain 3, skip 1 stitch. Single crochet in next stitch.* Repeat instructions from * to * around two more times. Chain 3, skip next stitch. Single crochet into first chain-3 space to join Round 2. (5, chain-3 spaces).

Round 3: Work 4 double crochet and one single crochet into first chain-3 space. First petal complete. Into next chain-3 space, work [1 single crochet, 5 double crochet, 1 single crochet]. Repeat for next 3 patterns. Slip stitch to first single crochet to join.

Fasten off.

Crochet Pattern
Round 2 after Chain 3 + 1, Skip next stitch, single crochet, chain 3
At the end of Round 2. Join last chain-3 with a single crochet into the first chain-3 space.
At the end of Round 3, after 4 petals have been made.
Crochet Flower
Finished Crochet Flower!

Crochet Flowers Pattern


Crochet, Free Patterns

Crochet Shamrock Pattern (Free)

crochet shamrock patternSt. Patty’s day is quickly approaching.  Which means: Shamrock Shakes at McDonald’s (yum!), a free crochet pattern for you (yes!), as well as celebrating my older brother’s birthday (yay!).  Brother Bill was born almost 26 years ago on this famously Irish holiday and for some reason, my parents felt an obligation to pay homage to the motherland, though we are very much German and Ukrainian.  I get my pale skin honestly.  And so was born William Brian… But I’ve always wondered – Is “Brian” Irish? Ha, apparently it made sense at the time.

Enough of the family history – onto the pattern!

Crochet Shamrock Pattern

Finished size – about 4 inches from stem to top.  Adjust your hook size to make a smaller or larger clover.

Materials

  • Crochet hook size H (5.0mm)
  • Worsted Weight Yarn

Crochet Pattern

Make a beginning loop by using a slip stitch or the magic ring method.  The shamrock’s petals will be worked into this center ring.

Petal 1: * Chain 4 (counts as Ch 3 + first sc), Work 3 treble crochet into center ring.  Chain 3, single crochet into ring.*

Repeat instructions for Petal 1 twice more to make 3 petals, or 4 if you’re feeling lucky!

Stem: After working petals, chain 4.  Work 4 slip stitch in chains just made, working back towards the petals.  Join with a slip stitch to last sc of final petal.

Fasten off.

Crochet Shamrock Pattern (Free)

Each St. Patrick’s Day when we were younger, my mom used to throw green-themed St. Patty’s Day parties for Brother Bill.  Poor guy – always had mint chocolate chip ice cream, shiny green garland, and treatbags filled with shamrock-covered pencils and any other holiday items Oriental Trading happened to carry.  If only I had thought to make this pattern sooner, I’m sure my mom would have somehow worked crocheted shamrocks into the decor!

Hope you enjoy the pattern.  I could see these being used for garland, a pin, or be adorable sewn onto a headband for some Irish spirit. Best of luck and happiness to you!

large crochet shamrock pattern

Crochet

Free Patterns, Giveaways

The Crochet Challenge

Happy New Year!  So here’s the deal.  Let’s make a pact and together take “The Crochet Challenge”.  What, you may ask, is the crochet challenge?  Great question!

The Crochet Challenge

You have three options to choose from:

  1. For the beginner – Learn to crochet
  2. For the crocheter – Write your own crochet pattern OR complete 5 unfinished crochet projects
  3. For the serious crafter – Try 5 new patterns and give what you make as gifts OR crochet and donate 10 crocheted items to the charities of your choice

crochet -challenge

Are you up for it?  It won’t be easy, but what a great way to start out 2013!  To help you begin, here are some links:

Learn to Crochet

Writing a Crochet Pattern

New Crochet Patterns

Crochet Charities

__________________________________________________________________________________

If you’d like to take the 2013 Crochet Challenge and make it the year of crochet – Let’s go!  Make sure you spread the word and let others know about the CC.

I’ll be posting a follow-up entry in a few weeks and if you’ve completed the CC, you’ll have a chance to win fun crochet things – more free patterns, crochet supplies, finished crochet items, etc.  And if you’d like to submit what you’ve made as part of this challenge, you can have your photo featured!

Free Crochet Newsboy Hat

Don’t forget to pass along: Click to share on Twitter or Click to share on Facebook.

Copy and past the code below to display the “I took the Crochet Challenge” badge on your blog:

<a href=”https://www.jjcrochet.com/the-crochet-challenge”>
<img alt=”i-took-the-crochet -challenge” src=”https://www.jjcrochet.com/wp-content/uploads/2013/01/crochet-challenge-300×137.jpg” width=”300″ height=”137″ /></p></a>

_________________________________________________________________________________

P.S. This post is to celebrate my 7 year Etsy-versary celebration!  Seven years ago on December 30, 2005, I opened JJCrochet’s Etsy store.  Every year, I like to celebrate the day by having a giveaway.  This year, I’m combining a free crochet pattern giveaway AND a New Year’s Crochet Resolution. Happy Etsy-versary to me and a very Happy New Year to you!  **Thanks to all who participated in this free crochet pattern giveaway!  Over 125 patterns were given away during a two week period.  Enjoy!!**

Crochet, Free Patterns, Projects

Crochet Hat: Free Pattern

crochet hat pattern

It’s December!  Where does the time go?  It’s a cold, quiet Sunday afternoon here in Cleveland.  I’m watching Inception, eating butternut squash bisque, and writing crochet patterns.  Isn’t that what everyone’s doing?

Thanks to everyone who took my survey – over 200 responses and more coming in every day!  The overwhelming majority of you said you wanted more crochet patterns and I aim to please (and shouldn’t be too hard – this is a crochet blog).

I’ve written a pattern for this lovely hat.  It’s chunky, it’s bulky, and I have been wearing it all afternoon.  Since we’ve determined not to turn on our heat until absolutely necessary, the air in the apartment has an edge to it.

This hat is ribbed.  It’s made flat.  You sew up the side and sew up the top and you have yourself a sideways-stitched hat. Most crochet hats are made in the round, from the top down, but this method makes the stitches go in a different direction.  If you can make a rectangle – you can make this hat!

Crochet Hat: Free Pattern (Ribbed)

finishedcrochethat

Materials

  • Size L (8.0mm) crochet hook
  • 106 yards super bulky yarn – I used Lion Brand Wool-Ease Thick & Quick. This pattern uses every last inch of yarn, so if you’re planning to make a bigger hat, you’ll need a second skein of yarn.

Stitches Used

  • HDC – Half-double crochet
  • Ch – Chain
  • SC – Single Crochet

Pattern

Note: Pattern is worked in back loops only (BLO).

Leaving 12 inch tail of yarn, Chain 24 + 2 (counts as first HDC)

Row 1: HDC in each stitch across (25 stitches)

Row 2: Chain 2, turn.  Working in BLO, HDC in each stitch across (25 stitches).

Repeat Row 2 until you have 21 Rows.  At this point, you’ll have a rectangle measuring 16.5 inches wide by 13 inches tall.

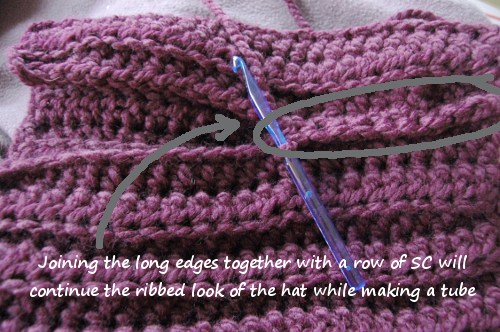
Do not fasten off yarn.  Fold long sides together.  Single crochet the sides together.  This row will be ridged, just like the rest of the hat.

Do not fast off yarn. Single crochet around the edge of the tube you just made.  This will be the edging of what you’ll fold up to be the brim of your hat.

Now, fasten off yarn.

Using the long tail of yarn you left at the beginning, loosely weave the needle the entire way around the second side of the tube in two inch long stitches.  You’re trying to create a drawstring that will pull the top of the hat closed.  Pull end of yarn so the top of your hat tightens.

Weave in ends.

This hat is easy to crochet – it’s the assembly part that can be a little tricky.  Hope the picture helped.  This is a quick crochet gift that’s perfect for those last minute parties.

Related Posts: 


Crochet, Free Patterns, Projects

Crochet Baby Hat Pattern: Newborn Bear

Crochet Baby Bear Hat PatternMy coworker is having a baby and I could not be more excited!  This coworker (let’s call him “JB”) was the first person to train me at my new job.  As such, JB and I have a “complicated” relationship.  Mostly it involves him trying to hate me and me trying to win his favor.  I will often say “Jay-beee” around the office when I see him and it wasn’t til months later that he confided that he hates that nickname.

Well too bad, JB.  It’s your name!  And get this – JB’s wife is also “JB” and their son–who is due in two weeks–will soon be another JB.  Soooo cute.

JB relentlessly kids about my crochet skills so I thought there would be no better way to finally bury the hatchet once and for all than to make his soon-to-be son a hat.  And so was born (pun intended)….

Baby/Newborn Crochet Bear Hat Pattern

Crochet Baby Hat Pattern

Materials

  • Size H (US 8/5.00mm) crochet hook
  • 80 yards worsted weight yarn (I used Vanna’s Choice in Taupe)
  • 5 yards of another color (center of the ears – I used Lion Brand Wool-Ease Worsted in Cocoa)

Crochet Stitches

  • Chain (ch)
  • Double Crochet (dc)
  • Front Post Double Crochet (fpdc)
  • Half Double Crochet (hdc)
  • Slip Stitch (sl st)
  • Single Crochet (sc)

Finished Size: Hat is 6.25 inches across (12.5 inches around) and 5 inches tall (not including ears).  Will fit newborn sized baby.

Note:**Some crocheters are reporting a small hat – Repeat Rounds 5-7 a few more times to make a hat longer.

Newborn Crochet Hat Pattern

Chain 3.  Join with sl st to form ring.

Round 1: Ch 2 (counts as first dc now and throughout), 9 more dc into ring.  Join to top of ch-2 with sl st. [10 stitches]

Round 2: 2 dc in each stitch around.  Join to top of ch-2 with sl st. [20 st]

Round 3: *2 dc in first dc, dc in next 2 dc*.  Repeat from * to * around.  Join to top of ch-2 with sl st. [27 st]

Round 4: *2 dc in first dc, dc in next 3 dc*. Repeat from * to * around.  Join to top of ch-2 with sl st. [33st]

Rounds 5-7: Dc in each st around.  Join to top of ch-2 with sl st. [33 st] **Note: If you’d like a longer hat, repeat Rounds 5-7 a few more times before Round 8.

Round 8: *dc in first stitch, fpdc in next stitch*.  Repeat from * to * around.  Join to top of ch-2 with sl st.

Fasten off.

Bear Ears (make two)

Using darker color yarn for center of ears, Chain 3.  Join with sl st to form ring.

Round 1: Ch 2, 9 more hdc into ring.  Join to top of ch-2 with sl st. [10 st]

Round 2: Join main color yarn used for hat.  Ch 1, 2 sc in each stitch around. Join to top of ch-2 with sl st. [20 st]

Fasten off, sew ears onto sides of hat.

Baby Hat Pattern

Instagram pic

JB’s wife is due in two weeks so the little guy could be here anytime!  I hope she makes it through the weekend so I can give JB this hat on Monday.  Hold on, little guy… only two more days!

What are some of your favorite patterns to make for newborn kiddos?

Crochet this bear hat with other Ravelry-ers here:

Crochet, Free Pattern Friday, Free Patterns

Chevron Crochet Cowl Free Pattern

Keeping good on my promise from JJCrochet’s Facebook page to share the pattern, I pulled out my notes and here you have it: a free crochet pattern for a  chevron cowl.  I’ve been obsessed with chevron/ zig-zag prints and made a cute chevron hat last night.  I’m still working out the kinks of the pattern, but will hopefully have that finished soon.

Crochet Ripple Chevron Cowl Pattern

Crochet Chevron Cowl Pattern

Materials

  • Size H (5.0mm) crochet hook
  • Worsted weight yarn (I used my go-to favorite, Vanna’s Choice)

Finished Size

6 inches wide; 31 inches around.

To make cowl larger or smaller, work in multiples of 12. Cowl is worked in flat, then sewn together using the infinity loop method.

Instructions

Chain 84 +2  (Extra chain 2 counts as first Dc).

Row 1: Skip 2 chain, Dc in next 3 chains. *2 Dc in next chain, 2 dc in next chain.  Dc in next 4 chain.  Dc2tog, dc2tog.  Dc in next 4 chain.* [<–Repeat is worked across 10 stitches]. Repeat from * to * around, ending with 1 Dc. Chain 2, turn. (82 stitches)

Row 2: Working in back loops only (blo), Dc in first 3 chains.  *2 Dc in next chain, 2 dc in next chain.  Dc in next 4 chain.  Dc2tog, dc2tog.  Dc in next 4 chain.*  Repeat from * to * around, ending with 1 dc.  Chain 2, turn (82 stitches)

Repeat Row 2 seven more times until you have a total of 9 rows.

Using the infinity loop method, twist ends of cowl before sewing together.  Using this method will put a half-twist in your cowl and allow it to lie flat.

Crochet Chevron Pattern

Crochet Ripple Chevron Pattern

Also, this was very unintentional, but I am about to leave for a long weekend and took a day off of work soooo this is a throw back to “Free Pattern Friday“.  (For those who weren’t around last summer, every Friday, I would post–you guessed it–a free pattern.)  Coming full circle – love it.

Make sure to share it if you like it!

Crochet, Free Patterns, Videos

Crochet Flower Pattern (Advanced: Ridged Version)

Ridged Crochet Flower Pattern

Before I dive right into the pattern, you may have noticed JJCrochet and this blog have gotten a facelift!  No more blue and black borders – the pink and cream/ tan/ gray theme is in charge of the show.  I was getting tired of the old layout and wanted a site that was better from a design perspective, now that I spend a good majority of my time (real job) online.  I never was much of a pink girl, but it’ll do.

Okay – so onto the pattern. I was crocheting a hat yesterday when I wanted to add a flower, but not a typical flower.  I’ve made designs in the past and figured it was time I chronicled the unique style of crocheting ONTO of the stitches.  Yes, you heard correctly – this flower is worked all in one piece.  The third round that gives the raised, 3-D circle in the center is made by working on the sides of the stitches of Round 1.

If it sounds confusing, don’t worry – I’ve made a video showing what to do:

The crochet video is also a good introduction of how to make this style of flower and is super easy and simple enough for someone who know a few stitches.  I’ve gotten feedback from other videos I’ve made that I crochet a bit too fast (guilty), so I tried to slow it down.  Watching it back, it still might be too quick, but I tried to crochet as slowly as I could without poking myself in the eyes.  {If you listen closely, I sigh twice in the video during my painfully slow crochet session.}

Crochet Flower Pattern

So here’s the pattern for the flower.  Either follow it the whole way through if you’re an adventurous, advanced crocheter, or stop after Round 2.  Whichever way you choose to go, you’ll still end up with a cute little flower.

Crochet Flower

Crochet Ridge Flower Pattern

Crochet Flower Pattern (with Ridged Center)

Materials

Size J crochet hook (or whatever sized project you’re working on)

Worsted weight yarn (I used my go-to favorite, Vanna’s Choice)

Instructions

Chain 3.  Join with sl st to first chain to form ring.

Round 1: Ch 2 (counts as first dc), dc into loop.  *Ch 3, 2 dc into loop*.  Repeat around until you have 10 dc and five, ch-3 loops. Join with sl st into first ch-3 loop of round.

Round 2: Ch 1 (counts as first sc).  Work 5 dc, 1 sc into ch-3 loop.  (Skip 2 dc from previous round),  Work *1 sc, 5 dc, 1 sc into ch-3 loop*.  Repeat around to make 5 patterns.  Join with sl st to first sc.

Congrats, you’ve made a flower!  If you’d like to work the ridge at the center of the flower, continue on.  If not, Fasten Off.

Crochet Ridged Flower Pattern

Center Ridge of Flower (Check out the video for extra clarity)

Slip stitch into top of first dc from Round 1.

Work 1 sc into side of each double crochet stitch from Round 1 (10 sc).  Join with sl st to first sc.  Chain 1(optional).  Fasten off.

If you need a visual for how to work the ridge, check out the video – I promise it’ll help.

So there’s the flower – did you like this pattern?  Did you try the ridge?  I’d love to hear if you did.  Post below in the comments and let me know how it went for you.

Crochet, Free Patterns, Videos

Crochet Headband Pattern – Free

Crochet Lattice Headband Pattern

I received a lovely comment today from “my biggest fan, Stephanie” and was so inspired, I pulled out the hooks and made a crochet pattern.  Not only did I make a new pattern, but I was feeling so motivated, I also created a video showing how to make the headband. Please forgive my post-workday hair.

The pattern in itself is not complicated, but it can be a bit confusing to understand.  Also, I believe I say “interwined” in the video which I am almost 100% positive is not a word in the English language.  Oh well, ha, I can’t be bothered with silly things like pronunciation while I’m crocheting!

This headband creates a really unique looking pattern without any effort.  If you can make a chain, know how to slip stitch, and can count, you can crochet this little guy.  I grabbed a skein of yarn, found my crochet hooks, and 5 minutes later this little guy was born.  Enjoy!

Crochet Headband Pattern

Materials:  Size H (5.0mm) crochet hook and a few yards of worsted weight yarn

Directions

Chain 25

Chain 5, work a slip stitch into the top of the 25th chain (first circle made)

Flip your work to make the slip stitch easier to work (optional – watch the video for clarification, I promise it’s not as complicated or advanced as it sounds!)

*Chain 5, slip stitch into previous circle.  Flip work.*

Repeat from * to * around until you have 28 circles.

Chain 25 (creates second headband tie).

Fasten off, weave in ends.

Crochet Lattice Pattern

Crochet Headband Pattern

Let me know if these instructions and video helped and if you could actually crochet the headband yourself.  Sometimes, I forget that even though things make sense to me, it doesn’t do any good unless others can understand them, too.  Let me know if you try your hand at making this headband.

Crochet headband pattern

Crochet, Free Patterns, Projects

Free Crochet Bird Pattern – 3rd Project

The day continues with the third project of “my big crochet idea“: a free crochet pattern for birds! Inspired by Kathleen’s post: “I’d love to see these cute little birds!! http://pinterest.com/pin/44613852528533507/I got to work as soon as I saw the picture.

After three tries, I finally crocheted what I deemed to be a good bird shape.  How cute are they?!  So  adorable. They take only minutes to make and a few yards of yarn.

Free Crochet Bird Pattern

Materials

Size G (4.25mm) crochet hook

Worsted weight yarn

Free Crochet Bird Pattern

Chain 4, join with sl st to form ring

Round 1: Ch 2 (counts as first dc), 14 more dc into ring (15 sts)

Round 2: Ch 1 (counts as first sc). Into same stitch, work [dc, 5 trc, dc, sc].  (Bird head). Sc in each of next 10 sc (around  bird belly).  Into next stitch, work [sc, ch 1, dc, ch 1, sc] (bird tail). Sc in each of next 3 sc (bird back).

Fasten off, weave in ends.

Bird Beak

Join yellow yarn at base of your bird’s head. Ch 4, sl st back into the stitch where you joined your yarn.

Fasten off, weave in ends.

Free Crochet Bird Pattern

Bird Eye

With black or white yarn and a big yarn needle, sew a couple stitches onto your bird’s face for an eye.

Free Crochet Bird Pattern

Free Crochet Bird Pattern
The dirty side of pattern writing...
Crochet, Free Patterns, Projects

A First – Free Crochet Snake Pattern

This is today’s second project of my big crochet idea, but it’s certainly a JJCrochet first.  If you follow my blog, you know I tend towards wearable items (most of which are geared towards girls).

But what better way to “shed my skin” then with this latest project.  Prompted by Juliana’s post on JJCrochet’s Facebook page, I designed and crocheted a reptile.

Yes, you read that correctly, a repitle.  A snake, to be exact.  It’s kinda cute… right?

Free Crochet Snake Pattern

Free Crochet Snake Pattern

Juliana’s request: “That is really nice of you! Ok, I know there are lots of patterns for snakes, but I have some leftover wool-ease thick and quick in greys that would make a cool snake. Do you think you could give me direction (or pattern) for a snake using thick and quick (since all the patterns I’ve found use thin yarn). Or maybe using thick and quick for a snake wouldn’t work? It was just a thought!” 

Free Crochet Snake Pattern

I had some Wool-Ease Thick & Quick here with me and thought this would be a fun crochet project so I began. Free pattern below so you can make your very own snake.  I hope you enjoy yours, Juliana!

Materials

Size L (8.0 mm) crochet hook

50 yards super chunky yarn.  I used Lion Brand’s Wool-Ease Thick & Quick in “Grey Marble”

Free Crochet Snake Pattern

Starting at snake tail: Ch 8, join with sl st to form ring

Round 1: Ch 2 (counts as first hds), Work 1 hdc in each chain (8 hdc). Join with sl st to first hdc

Rounds 2 – 25: Ch 2, do not turn. Hdc in the FLO (front loops only) of each st around (8 hdc).  Working in only the front loops of each stitch will give the snake a “textured”, scale-y look.  

Repeat Round 2 for as long as you want your snake to be.

Begin working the snake’s head.

Round 26: Ch 2, 2 hdc in each the FLO of each stitch (16 hdc).

Rounds 27 – 28: Ch 2, do not turn. Hdc in the FLO (front loops only) of each st around (16 hdc).

Round 29: Decrease Round. Ch 2, hdc 2 tog in next two sts and in each st around (8 hdc).

Rounds 30 – 31: Ch 1, sc in each st around (8sc).

Fasten off.

Whip stitch the bottom and top of your snake together.

Textured Snake Skin
Textured Snake Skin

Snake Eyes

Size J (6.0mm) hook

Worsted Weight black yarn

Chain 3, join with sl st to form ring.

Round 1: ch 1, work 9 more sc into ring (10 sc).

Fasten off, leaving a long tail for sewing onto the snake’s face.  Make two eyes.  Sew onto the snake’s head.

Snake’s Tongue

Size L (8.0 mm) crochet hook

Lion Brand Wool Ease Thick & Quick Yarn in “Cranberry”

Think of making the snake’s split tongue like a Y

Chain 8, fasten off. (the straight long part of the “Y”)

Join yarn at the end of where you fastened off, Chain 4. Fasten off (one “prong” of the “Y” made)

Join yarn at the same point where you fastened off, Chain 4. Fasten off (the other prong of the “Y”).

Weave in ends.

Sew tongue to your snake face.  Enjoy?

Crochet Snake Pattern

Free Crochet Snake Pattern


Crochet, Free Patterns, Giveaways, Projects

Free Crochet Pattern – Baby Headband for Girls

The first project made from my big crochet idea is this sweet little girl’s headband.  It’s very simple and a basic pattern for anyone to make for a newborn in their life.

Newborn Crochet Flower Headband

Maria responded to my request, “I’m so excited about this idea. I’m 8 and a half months pregnant, I’ve been looking for a simple and easy newborn dress pattern but if that’s too big maybe a nice headband with flower or flowers for spring? Thanks”

Instead of tackling a bigger project like a newborn’s dress, I instead designed a headband.  Maria, I’ll be mailing this out to you next week .  Congratulations on the upcoming birth of your daughter… I hope she enjoys her new headband!

Newborn Crochet Flower Headband

Materials

Size E crochet hook

45 yards Worsted Weight yarn.  I used Lionbrand Wool-Ease Worsted Weight in “Natural Heather” and some extra pink yarn.

Button for center of flower (optional)

Finished size

Headband measures 13 inches in diameter + stretch; 1.25 inches high

Crochet Headband Pattern for Newborn Girls

Fch 50.  Join with sl st to form ring.  (for instructions on how to work the “foundation chain” (fch), check out this post)

Round 2: ch 2 (counts as first sc + ch 1).  Skip next stitch. *sc, ch 1, skip next stitch*. Repeat around.  (25 scs, 24 ch-1 sts)

Rounds 3 – 5: ch 2, *sc in ch-1 space, ch 1*. Repeat around (25 scs, 24 ch-1 sts).

Fasten off, weave in ends.

Open Chain Flower

Ch 3, join with sl st to form ring.

Round 1: chain 9 (counts as first sc + ch 8). Ch 12, sc into ring. *Ch 8, sc, Ch 12* Repeat around until you have 5 loops/ petals (3, ch-8 loops, 2 ch-12 loops). Join to first sc with sl st.

Round 2: Working in back sc of previous round, sc. *ch 13, sc in next sc*. Repeat around until you have 5, ch-13 loops/ petals.

Fasten off, leaving a long tail of yarn to sew flower onto headband.

Sew flower onto left side of headband (button center optional).

Newborn Crochet Flower Headband